By Nick Stephenson (Part Three of… Well, several).
“I love deadlines. I love the whooshing noise they make as they go by.”
In Part One, we looked at coming up with story ideas – and how to “test” them to make sure they can support a full story (namely, by turning them into a premise).
Then, in Part Two, we looked at how to flesh out the premise into a full outline, and the key “phases” that needs to happen in each story to push the narrative forward, develop your characters, and keep readers turning the page.
Missed Parts One and Two? Catch up here: Part One | Part Two
With all that work done, now it’s time for the fun part – getting the words down onto the page. And remember: by this point, you’ve got your scenes list ready to go – so you already know “what to write about” (meaning no staring at the blinking cursor of doom).
And with that in mind, here are a few tips to get your first draft written in record time.
With all of the planning out of the way, you’re ready to start writing your first draft. You know what the story is about, you’ve got a good sense of your characters and what they want, and you know why they will end up in conflict with each other and how that conflict will resolve. You even know what happens in each scene. In short, you have everything you need to get underway.
Some advice from New York Times bestselling author of 40+ novels, Joe Nassise:
Writing for me is a question of focusing, so I use a system called sprinting to get my words done each day. I set a timer for 25 minutes and write during that time. No distractions with research or checking details or playing on social media – I just write. Just raw production without worrying about how good it sounds or if I could have said something better. Editing is for later; this part of my process is just for getting words down on paper.
During this sprint, you’ll also want to avoid getting buried in “research”. If you’re writing a crime thriller and aren’t sure about a particular police procedure or forensic science fact, mark this down and come back to it later (if you’re writing in Scrivener, you can add a note – or just highlight it in a particular colour). Same goes for historical points, locations, street names, or anything else you might need to “go look up somewhere”.
If you can avoid getting lost down the Wikipedia rabbit hole, your wordcount will improve dramatically.
When the 25 minutes are up and my timer dings, I get up and do something else for five or ten minutes. Give my brain a break. Then it back at it for another sprint of twenty-five minutes and so on. I try to four to six sprints a day if I can manage it. I average anywhere from 500 to 1500 words per sprint – depends on how my day is going, how focused I can remain throughout, etc. You’ll have your own rate, perhaps better, perhaps worse than mine. It isn’t a race, so no need to compare yourself to my pace. Just set your own and stick to it.
Here’s another great explanation of this technique from the fantastic Chris Fox, author of 5,000 Words Per Hour (amongst many, many others):
In a nutshell – the human brain can’t be creative and analytical at the same time (well, it can’t do it very well). So, to get into a “flow state” (as Chris calls it) you can use writing sprints to focus solely on getting the words on paper, then go back later to analyse, fix, add in your research, and tweak.
The sprints help keep your energy up, and with your outline and scenes list already prepared, you’re set to hit your daily wordcount goals.
And remember – even a fairly modest 1,700 words per day adds up to a 50,000+ word novel in less than a month. So if you break it up into chunks, the whole process gets a lot less overwhelming.

With your first draft down on paper (digital or otherwise) it’s time to celebrate. But the work isn’t done yet – and it’s time to switch our creative brains into “analytical mode” and get the manuscript into shape, ready for the final edit (more on this in a moment).
After all, in the immortal words of Mr. Hemingway:
“The first draft of anything is sh*t.”
So with that in mind, we need to run through a few steps to get the first draft ready for publication. Namely:
The Re-Writing Process: because we followed an outline (and tested our idea and premise) in the previous sections, there should hopefully be nothing too major here. In this phase, it’s time to flesh out the parts of the story you marked down as needing background research (eg, street names, historical facts, scientific points, etc) and looking out for any sections that “jar” when you read through them. In most cases, they will be minor tweaks.
^^ having your outline and scenes list and following the 7 phases we talked about in Part Two avoids the need for extensive re-writes. Yay!
The Self Edit: as the author, your brain is wired to see “what you meant to write”. Meaning, you’ll miss a swathe of errors. An easy way to “fix” this is to print the manuscript onto paper (or load it onto an e-reader / tablet / cell phone) and read it out loud to yourself. You’ll catch any errors your eyes would normally scan over – and fewer mistakes often means less money spent on a professional edit (it’ll be faster, too).
Spelling and Grammar Check: your word processor of choice should have one built in – and it’s the perfect “finishing touch” to getting rid of any remaining typos. But for more advanced functions, a tool like ProWriting Aid’s free grammar checker can check your entire book for issues (including suggestions on how to improve your style).
Check the video a little lower down the page for a walkthrough of this.
Professional Edit: this is where the copy edit comes into play. If you need developmental editing (in other words, someone to make sure your story structure makes sense) this would ideally be done at the outline phase – where the editor can point out any issues before you start writing. Though, hopefully, if you’ve used the process outlined in the first two parts, this shouldn’t be necessary. What you will need is a copy edit – where a professional can check through your manuscript for spelling, grammar, consistency, and other style issues.
Final Proof: once you’ve implemented the editor’s notes, you’ll need to run through the manuscript (at least) one more time to find any lingering typos. Ideally, you’ll get someone else to do this – either a professional proof reader, or someone who knows their stuff (many authors perform this service as a manuscript swap – so you’ll proof theirs in return).
Want to learn more about the editing process and what’s available? Check out this article over at the blog.
![]()
With your finished manuscript ready to go, you’ll need to turn it from a word processing document into an ebook-ready file.
To cover all your bases, you’ll want a .mobi file (for Amazon Kindle) and an .epub file for everywhere else. And it doesn’t hurt to have a PDF, either – which you can then also use for your paperback interiors.
There are dozens of options available here, but my favourites:
Free Options: Reedsy.com offers a free ebook conversion tool, and Draft2Digital can also convert your word processing document into the correct format. Just make sure you start off with a clean file – free of any erroneous formatting. Stick to Header 1 for Titles, Header 2 for chapter headings, and then Paragraph for your main copy. Don’t mess with indents or line spacing, keep it simple – all that stuff gets dealt with during the conversion process.
Premium: if you’re a Mac user and you have the cash, get Vellum. It’s by far and away the most robust software, it’s easy to use, and the results are fantastic. If you don’t have a Mac, try LiberWriter.
And if you’re already using Scrivener for your planning, plotting, and writing (highly recommended) this has a built-in ebook conversion tool. It’s not quite as user friendly as the other paid options, but it gets the job done.
Interested in taking a look at some of these apps? Check out the video below:
With your final manuscript formatted and ready to rock, you’ll want a cover design to help draw people in.
And if there’s any part of the publishing process where you’ll earn back your investment multiple times over, it’s with your cover.
A great cover can be the difference between “losing money” and earning back a triple-digit ROI.
In fact, we experimented with some cover design changes and saw our sales nearly quadruple – it’s that important.
And it’s not enough to just have a “nice looking cover” – you need a cover that’s genre appropriate, too. Take a look at what happened when we swapped out one book’s cover and measured the results:
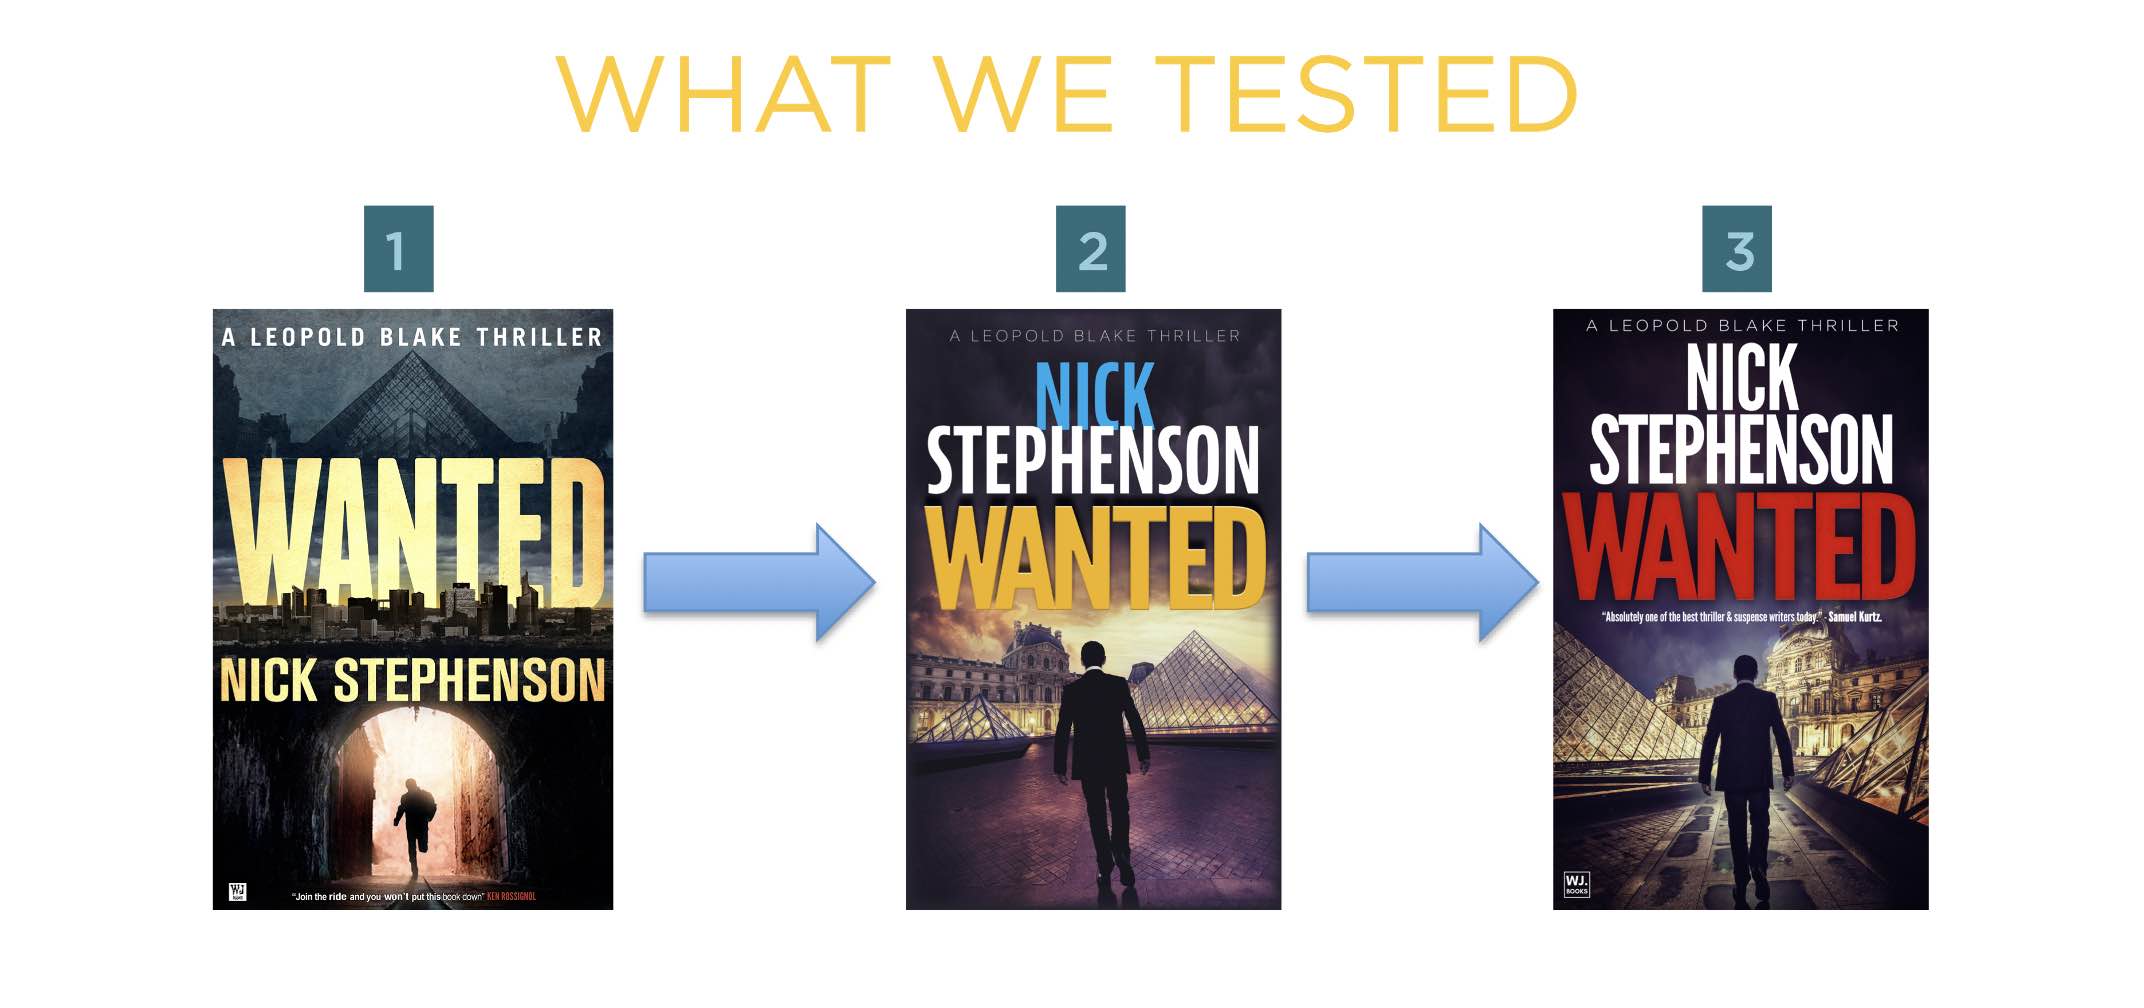
Cover 1 was the original cover. Then we tried 2, and finally settled on 3. At first glance, you might not notice all that much of a difference – but the data proved otherwise…
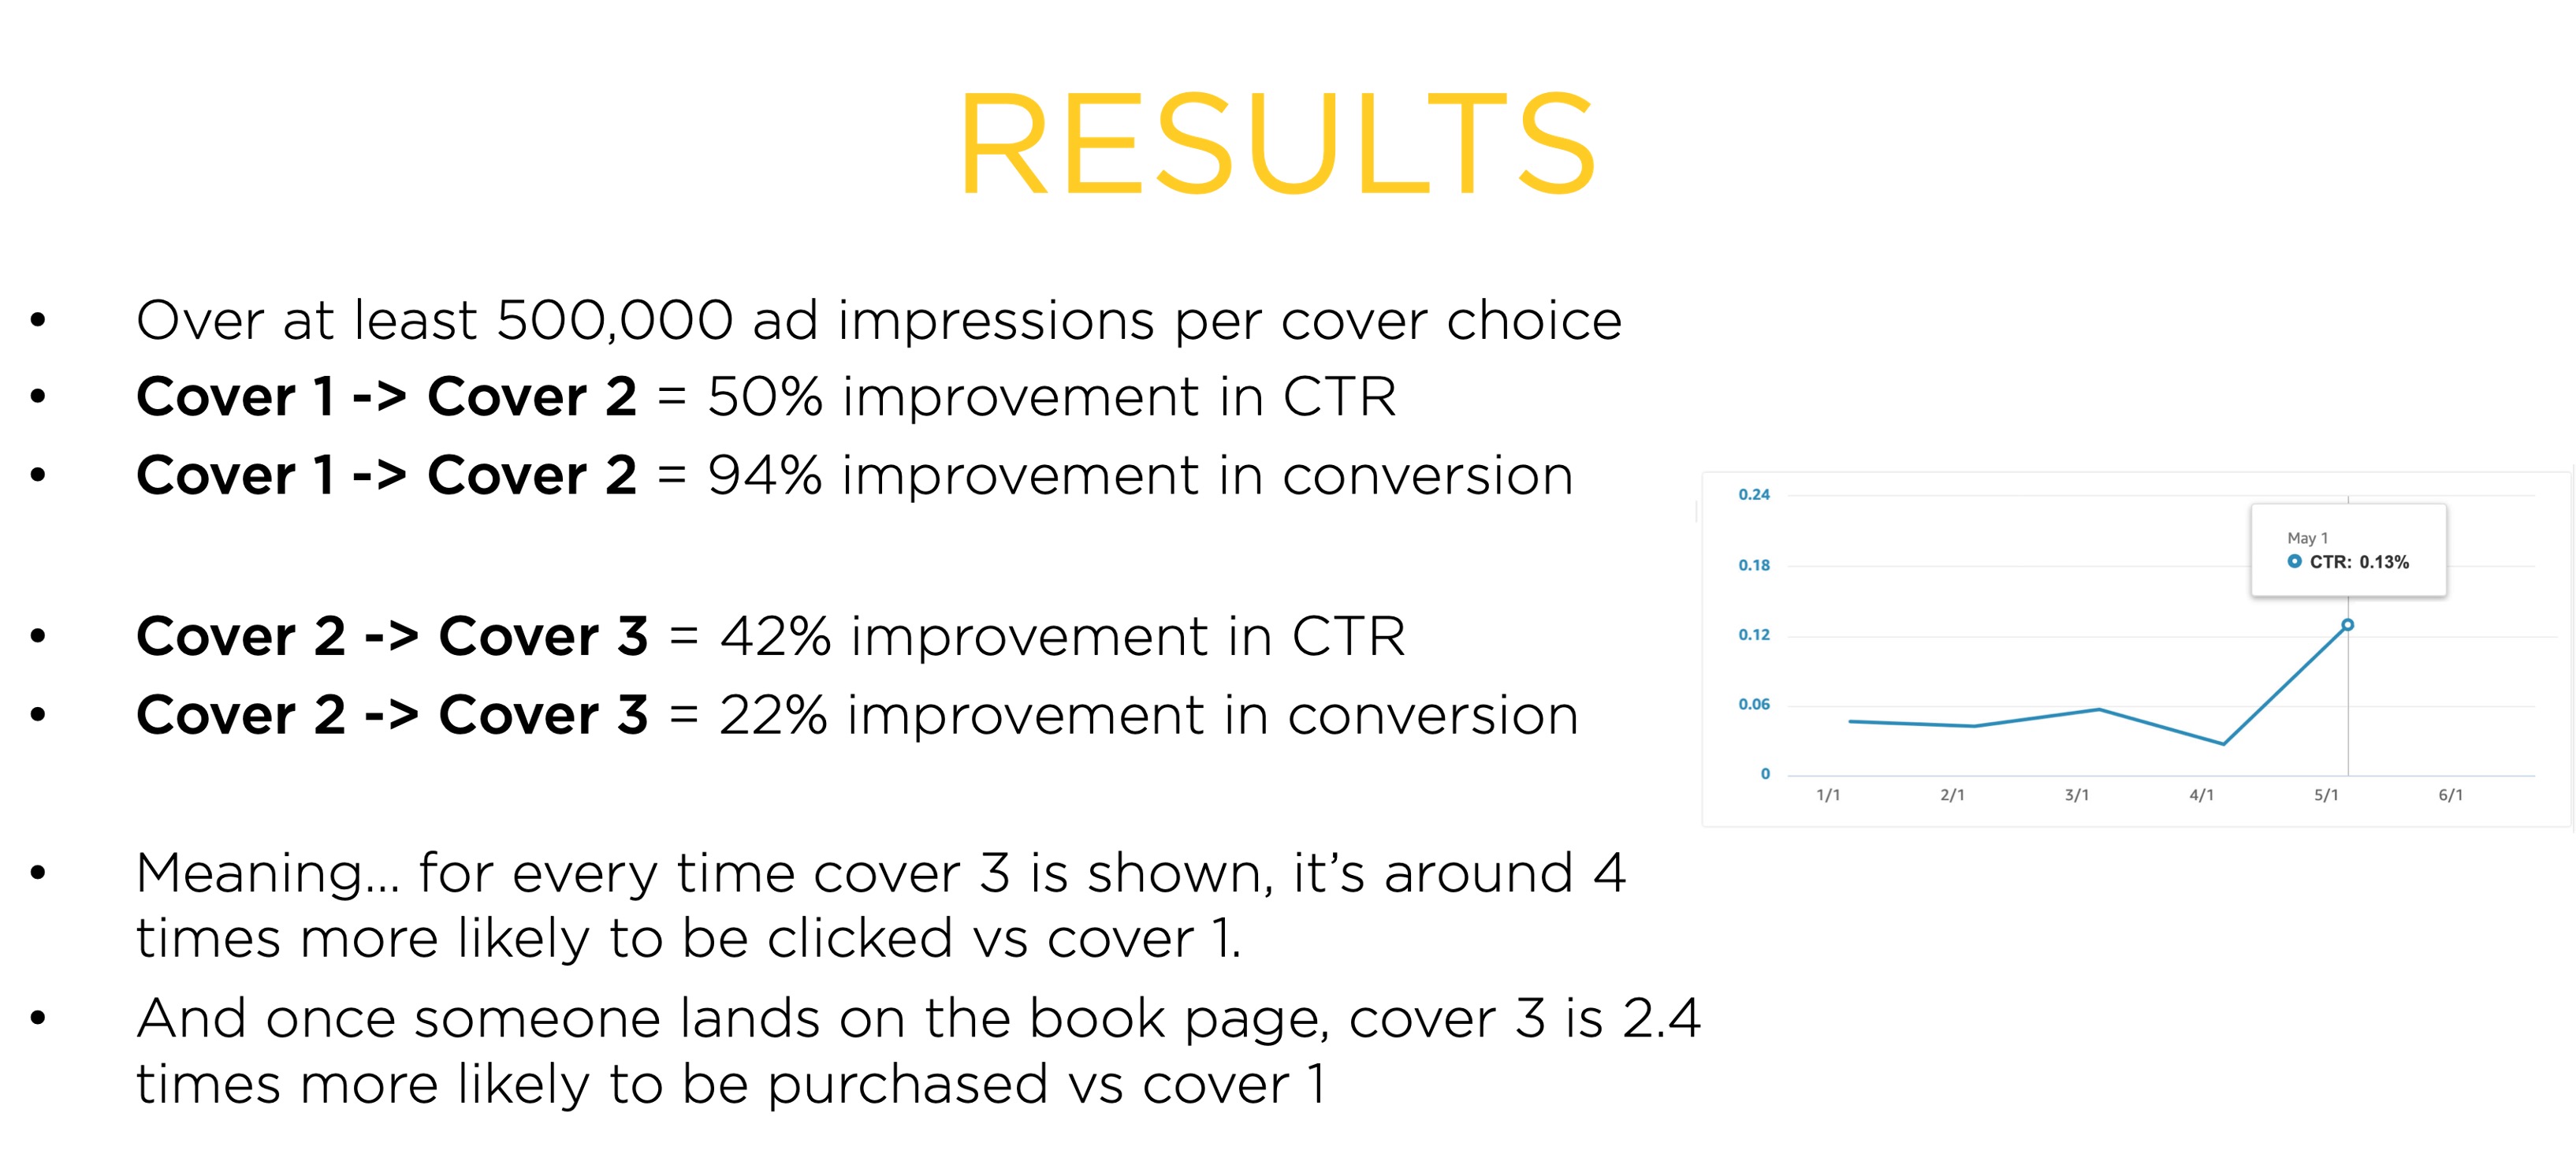
In other words – cover 3 resulted in nearly 4 times as many sales. And the reason? The composition is better – it draws the eye into the centre of the image. And – for thrillers – having red text also appears to have an influence.
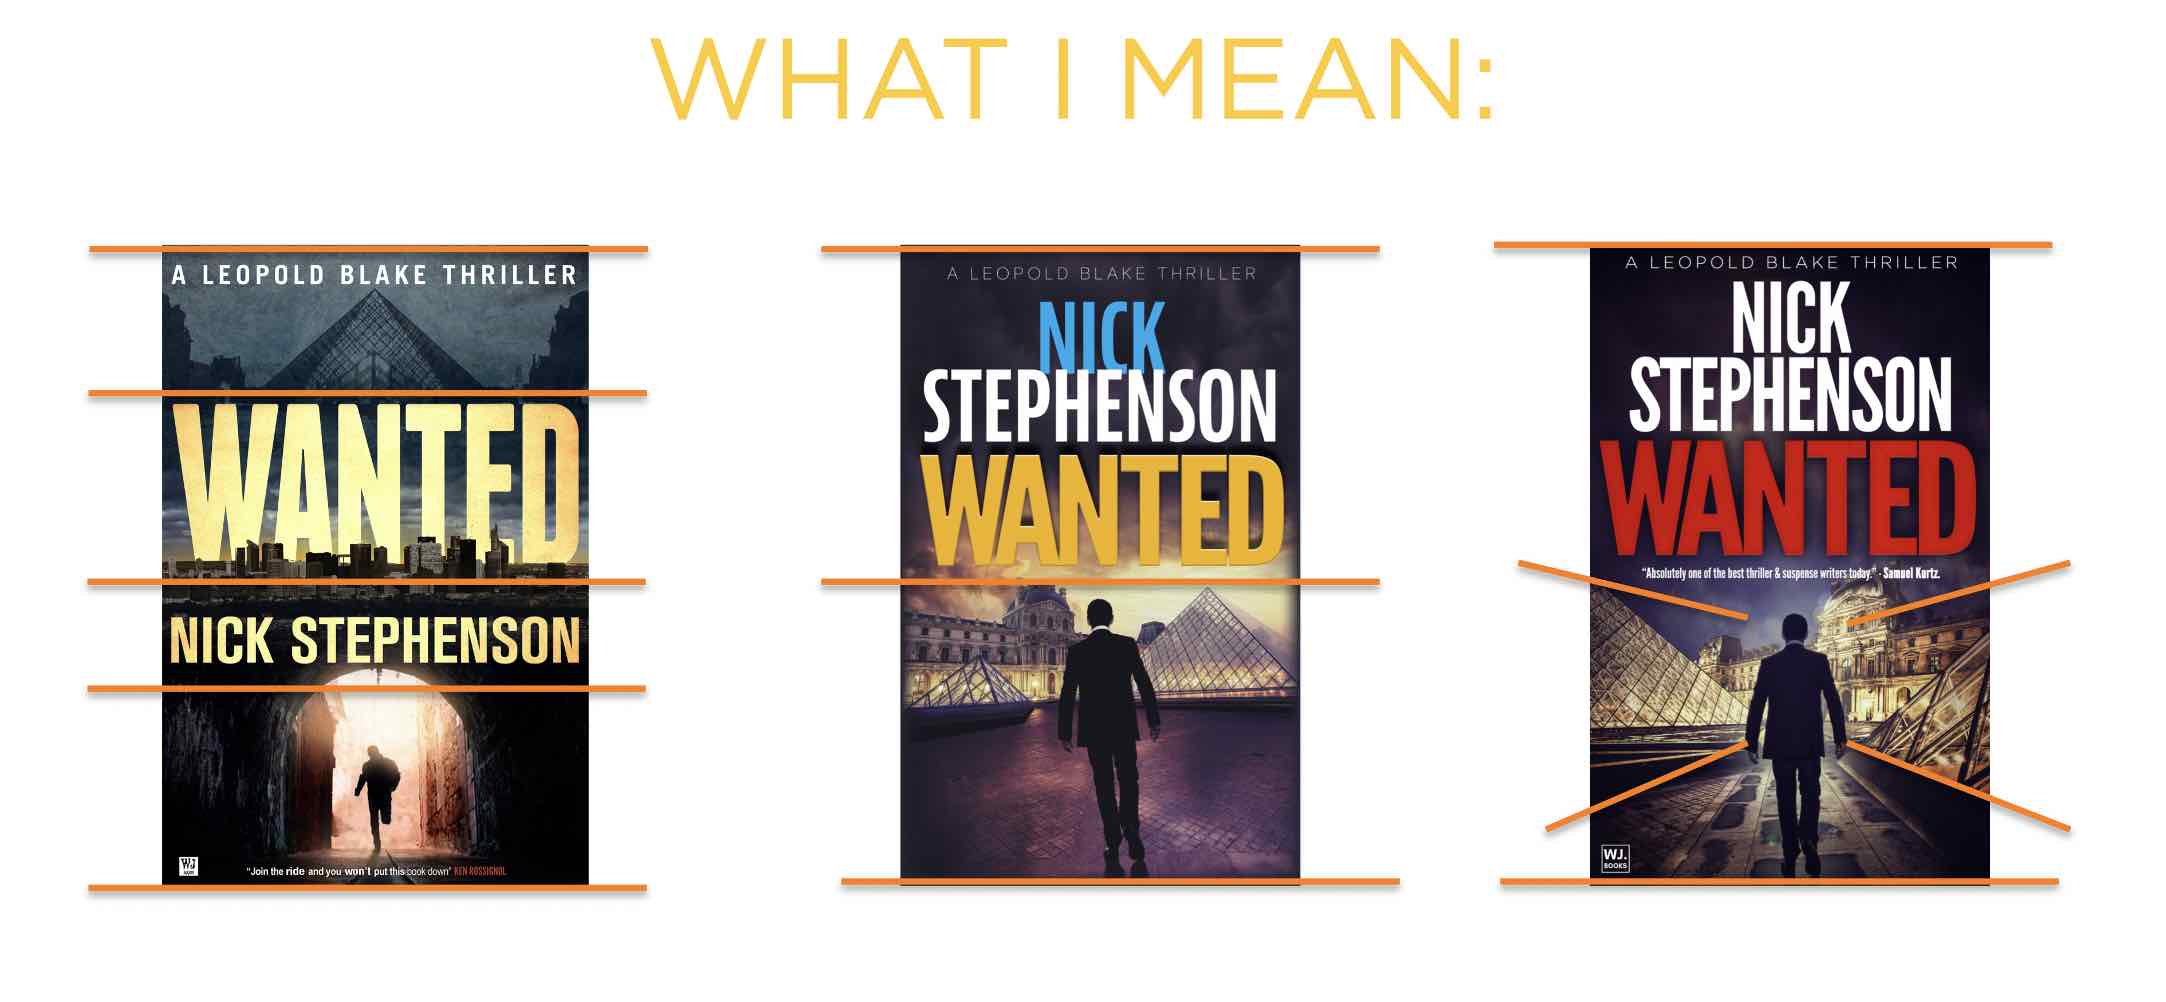
Notice how Cover 1 is divided into 3 sections, and Cover 2 is split in half. The third cover does a better job of drawing the eye – which led to a much higher click-through rate (and conversion rate).
Now, your cover requirements will vary by genre but the principles are the same – research what’s working! Here’s a video breakdown of how to get this right:
With your finished book edited, proofed, and formatted – and with your cover design ready to rock – it’s time to publish and launch. You’ll also want a marketing plan in place to grow your audience, subscriber list, and sales – so we’ll look at that in the next section.
Take a look at self-publishing formula’s Ads for Authors program and we’ll send you an exclusive bonus bundle when you enroll – more details here.